Submitted by: Justin Shepard (f3lbane)
Description:
This WMIC-based ZenPack adds the ability to easily monitor Microsoft Message Queues via WMI.
The ZenPack provides:
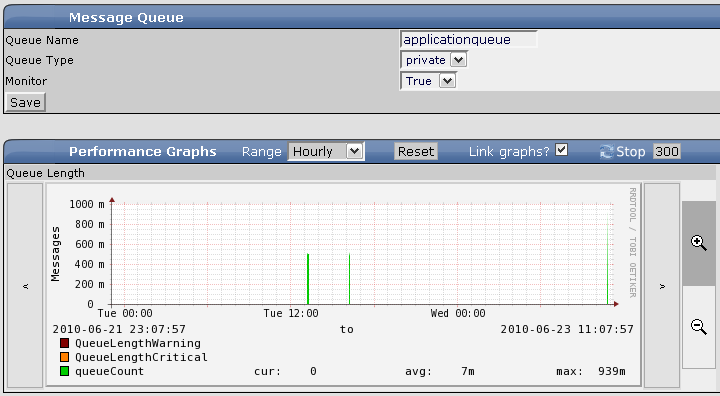
- Queue count polling and logging
- Threshold monitoring (defaults: 250 = Warning, 500 = Critical)
- Per-device and per-class threshold adjustments
NOTE: This ZenPack has only been tested against Zenoss 2.4.5.
Installation
- Install ZenPacks.community.deviceAdvDetail and ZenPacks.community.MsmqMonitor via command line or ZenPackManager.
- Navigate to /Devices/Server/Windows and open the "Flyout menu" => "More" => "Collector Plugins".
- Click "Add fields" to show the hidden box, then drag the "community.msmq.MessageQueueMap" item into the box on the left.
- Click "Save".
Usage
Adding Queues
Via Modeling
When modeling a device, the log screen will display an INFO-level message that indicates the number of queues the modeler discovered (i.e. “MSMQ: Found 15 queues.”). Ensure that this message appears before proceeding. If it does not, and you see an "NT STATUS" message at the top of the table, you may need to log in to the target server and execute the command: "wmiadap /f" (without quotes). This will create the MSMQ performance counters if they do not already exist (they are not created by default when installing MSMQ).
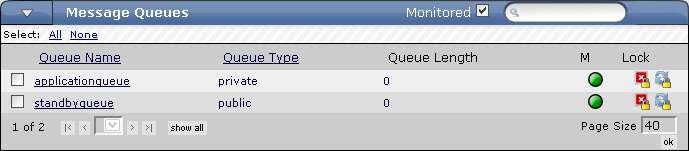
- After modeling is complete, click on the device’s “OS” tab and uncheck the “Monitored” box in the “Message Queues” table. This will display all queues, including both manually-added and modeler-discovered.
- Select the desired queues’ checkbox and click “Monitoring…” in the Message Queues table flyout menu
- Click the “Enable” radio button and then “OK”.
- Select the queues again and click “Lock/Unlock…” in the Message Queues table flyout menu.
- Click the “Lock Queues From Deletion” button.
Manually
- Navigate to the desired device’s OS tab.
- Click the “Add queue…” entry in the Message Queues table flyout menu.
- Enter the exact name of the queue and select the proper queue type.
- Click “Add”.
- In the breadcrumbs bar at the top of the screen, click “os”.
- Select the checkbox for the queue you just added and click “Lock/Unlock…” in the Message Queues table flyout menu.
- Click the “Lock Queues From Deletion” button.
Changing Thresholds
The default thresholds for MSMQ are Warning at 250 messages, Critical at 500 messages. These defaults can be adjusted globally, for sub-classes, or per-queue.
For All Queues
- Navigate to /Devices/Server/Windows.
- Click the “Templates” tab.
- Click the “MessageQueue” template.
- In the “Thresholds” table, make adjustments as desired.
For a Sub-class
Currently, defining a subclass is the only method of making threshold adjustments for specific servers without adjusting the global template.
- Navigate to /Devices/Server/Windows.
- Click the “Templates” tab.
- Check the box next to “MessageQueue” and choose “Copy Templates…” from the flyout menu.
- Select the target Device class. (It is suggested to use a subclass of /Server/Windows).
- Zenoss will automatically navigate to the Templates tab of the subclass you chose. Verify that the definition path for “MessageQueue” matches the path of the subclass.
- Click “MessageQueue”.
- In the “Thresholds” table, make adjustments as desired.
For a Specific Queue
- Navigate to the device and click on the desired queue name.
- Click the “Template” tab.
- In the “MessageQueue” row, click the “Create Local Copy” button.
- Confirm that the definition path changed to the path to the queue.
- Click “MessageQueue”.
- In the “Thresholds” table, make adjustments as desired.
Screenshots:
Creates table in OS tab:
Queue details w/graph:
Requirements:
- Zenoss Version: 2.4.5
- ZenPack Dependencies: Advanced Device Details
Source: http://zenpacks.zenoss.org/trac-zenpacks/browser/zenpacks/ZenPacks.community.MsmqMonitor
Tagged Releases:
Change History:
- 1.0 initial release
Tested: This ZenPack was tested with version 2.4.5.
Known issues:
Queue Type Unused
The “Queue Type” field is not currently used by the ZenPack. This field was added to allow for greater specificity when monitoring queues (i.e. both a public and private queue with the same name). This was intended to be a "nice to have" feature when I originally wrote the code, but I never spent the time to finish it. If someone wants to finish fleshing it out, be my guest.- Queues Must Be Locked
After adding or configuring a queue, it must be locked to prevent the ZenModeler from deleting it (if the queue object drops out of the WMI Perfmon pool). I attempted to implement a sanity check in the modeler that would ignore any existing queues, but due to the limitations of modeler plugins I was unable to quickly overcome this problem and opted for the locking mechanism instead. Takeaway: if you don't lock your queues after setting them to be monitored, they *may* disappear the next time the device is modeled (automatically or manually).
