#7.1. About Events
Events, and the graphs generated from performance monitoring, are the primary operational tools for understanding the state of your environment. This chapter defines events and describes the Zenoss event management system.
#7.1.1. Basic Event Fields
To enter the Zenoss event management system, an event must contain values for the device, severity, and summary fields. If an event is missing any of these fields, then Zenoss rejects it.
Basic event fields are:
device
ipAddress
eventState
severity
summary
message
evid
#7.1.1.1. device and ipAddress Fields
The device field is a free-form text field that allows up to 128 characters. Zenoss accepts any value for this field, including devices that are not in the database. If the device field contains an IP address, then Zenoss queries the database for devices with a matching address. If it finds a match, it changes the device field to the found device name.
The ipAddress field is a free-form text field that allows up to 15 characters. This field is not required. If Zenoss cannot successfully locate a device based on the event's device field content, it attempts to find the device based the event ipAddress field content, if present.
Zenoss automatically adds information to incoming events that match a device in its database. Fields added are:
prodState - Specifies the device's current production state.
Location - Specifies the location (if any) to which the device is assigned.
DeviceClass - Classifies the device.
DeviceGroups - Specifies the groups (if any) to which the device is assigned.
Systems - Systems (if any) to which the device is assigned.
DevicePriority - Priority assigned to the device.
For more information about these fields, refer to the chapters titled "Production States and Maintenance Windows" and "Organizers and Path Navigation."
#7.1.1.2. eventState Field
The eventState field defines the current state of the event. This field is often updated after an event has been created. Values for this numeric field are 0-2, defined as follows:
| Number | Name |
|---|---|
| 0 | New |
| 1 | Acknowledged |
| 2 | Suppressed |
#7.1.1.3. severity Field
The severity field defines the severity of the event. Values for this numeric field are 0-5, defined as follows:
| Number | Name | Color |
|---|---|---|
| 0 | Clear | Green |
| 1 | Debug | Grey |
| 2 | Info | Blue |
| 3 | Warning | Yellow |
| 4 | Error | Orange |
| 5 | Critical | Red |
#7.1.1.4. summary and message Fields
The summary and message fields are free-form text fields. The summary field allows up to 128 characters. The message field allows up to 65535 characters. These fields usually contain similar data.
Zenoss handles these fields differently, depending on whether one or both are present on an incoming event:
If only summary is present, then Zenoss copies its contents into message and truncates summary contents to 128 characters.
If only message is present, then Zenoss copies its contents into summary and truncates summary contents to 128 characters.
If summary and message are both present, then Zenoss truncates summary contents to 128 characters.
As a result, data loss is possible only if the message or summary content exceeds 65535 characters, or if both fields are present and the summary content exceeds 128 characters.
To ensure that enough detail can be contained within the 128-character summary field limit, avoid reproducing information in the summary that exists on other fields (such as device, component, or severity).
#7.1.1.5. evid
The evid field is the event identifier, or event ID. It is a 36-character, unique identifier for every event that comes into the system. An incoming event should never have an evid assigned to it, because Zenoss creates it immediately before the event is inserted into the database. If an incoming event does have an assigned evid, then Zenoss ignores it and replaces it with a generated evid.
#7.1.2. Other Fields
Zenoss events include numerous other standard fields. Some control how an event is mapped and correlated; others provide information about the event.
The following table lists additional event fields.
| Field | Description |
|---|---|
| depuid | Dynamically generated fingerprint that allows Zenoss to perform de-duplication on repeating events that share similar characteristics. |
| component | Free-form text field (maximum 255 characters) that allows additional context to be given to events (for example, the interface name for an interface threshold event). |
| eventClass | Name of the event class into which this event has been created or mapped. |
| eventKey | Free-form text field (maximum 128 characters) that allows another specificity key to be used to drive the de-duplication and auto-clearing correlation process. |
| eventClassKey | Free-form text field (maximum 128 characters) that is used as the first step in mapping an unknown event into an event class. |
| eventGroup | Free-form text field (maximum 64 characters) that can be used to group similar types of events. This is primarily an extension point for customization. Currently not used in a standard Zenoss system. |
| stateChange | Last time that any information about the event changed. |
| firstTime | First time that the event occurred. |
| lastTime | Most recent time that the event occurred. |
| count | Number of occurrences of the event between the firstTime and lastTime. |
| prodState | Production state of the device when the event occurred. If an event is still active when a device's production state is changed, the event's prodState will be updated accordingly. |
| suppid | If this event has been suppressed by another event, then suppid contains the other event's evid. |
| manager | Deprecated. The monitor field replaces this field. |
| agent | Typically the name of the daemon that generated the event. For example, an SNMP threshold event will have zenperfsnmp as its agent. |
| DeviceClass | Device class of the device that the event is related to. |
| Location | Location of the device that the event is related to. |
| Systems | Pipe-delimited list of systems that the device is contained within. |
| DeviceGroups | Pipe-delimited list of systems that the device is contained within. |
| facility | Only present on events coming from syslog. The syslog facility. |
| priority | Only present on events coming from syslog. The syslog priority. |
| ntevid | Only present on events coming from Windows event log. The NT Event ID. |
| ownerid | Name of the user who acknowledged this event. |
| clearid | Only present on events in history that were auto-cleared. The evid of the event that cleared this one. |
| DevicePriority | Priority of the device that the event is related to. |
| eventClassMapping | If this event was matched by one of the configured event class mappings, contains the name of that mapping rule. |
| monitor | In a distributed setup, contains the name of the collector from which the event originated. |
#7.1.3. Details
In addition to the standard fields, Zenoss also allows events to add an arbitrary number of additional name/value pairs to events to give them more context. The name and value of these details are limited to 255 characters in length.
#7.1.4. De-Duplication
Zenoss uses an event "de-duplication" feature, based on the concept of an event's fingerprint. Within Zenoss, this fingerprint is the "depuid." All of the standard events that Zenoss creates as a result of its polling activities are de-duplicated, with no setup required. However, you can apply de-duplicating to events that arrive from other sources, such as syslog, SNMP traps, or a Windows event log.
The most important de-duplication concept is the fingerprint. In all cases, an event's fingerprint (or dedupid) is composed of a pipe-delimited string that contains these event fields:
device
component (can be blank)
eventClass
eventKey (can be blank)
severity
summary (omitted from the dedupid if eventKey is non-blank)
When the component and eventKey fields are blank, a dedupid appears similar to:
www.example.com||/Status/Web||4|WebTx check failed
When the component and eventKey fields are present, a dedupid appears similar to:
router1.example.com|FastEthernet0/1|/Perf/Interface|threshName
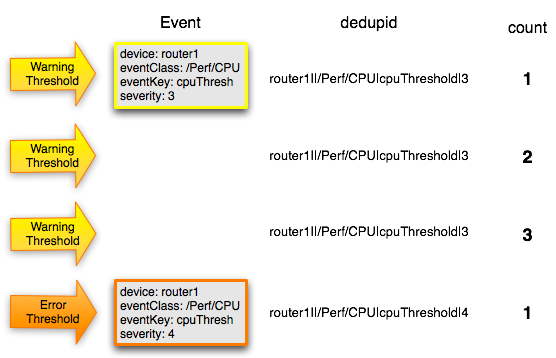
When a new event comes into the system, the dedupid is constructed. If it matches the dedupid for any active event, the existing event's count field is incremented by one, and its lastTime field is updated to be the current time. If it does not match the dedupid of any active events, then it is inserted into the active event table with a count of 1, and the firstTime and lastTime fields are set to the current time.
The following illustration depicts a de-duplication scenario in which an identical event occurs three times, followed by one that is different in a single aspect of the dedupid fingerprint.
If you want to change the way de-duplication behaves in Zenoss, you can use an event transform to alter one of the fields used to build the dedupid. You also can use a transform to directly modify the dedupid field, for more powerful cross-device event de-duplication.
#7.1.5. Auto-Clear Correlation
Zenoss' auto-clearing feature is similar to its de-duplication feature. It also is based on the event's fingerprint. The difference is which event fields make up the fingerprint, and what happens when a new event matches an existing event's fingerprint.
All of the standard events that Zenoss creates as a result of its polling activities do auto-clearing by themselves. As with de-duplication, you would invoke auto-clearing manually only to handle events that come from other sources, such as syslog, a Windows event log, or SNMP traps.
The auto-clear fingerprint for an event is built by using the combination of these fields:
device
component (can be blank)
eventKey (can be blank)
eventClass (including zEventClearClasses from event class zProperties)
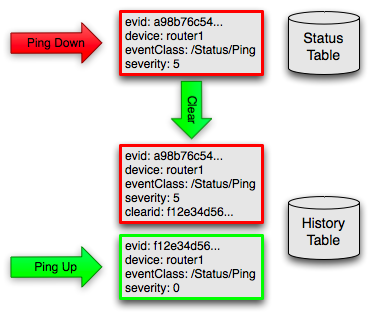
When a new event comes into Zenoss with a special 0 (Clear) severity, Zenoss checks all active events to see if they match the auto-clear fingerprint of the new event. All active events that match the auto-clear fingerprint are moved from the active events table to history, and their clearid field is set to the evid of the event that cleared them.
If an event is cleared by the clear event, it is also inserted into the event history; otherwise, it is dropped. This is done to prevent extraneous clear messages from filling your events database.
The following illustration depicts a standard ping down event and its associated clear event.
If you need to manually invoke the auto-clearing correlation system, you can use an event transform to make sure that the clear event has the 0 (Clear) severity set. You also need to ensure that the device, component, and eventClass fields match the events you intend to clear.
Note
Avoid making clear events too generic; otherwise, you may inadvertently clear a wider variety of events that you intend.
#7.1.6. Event Consoles
Zenoss features multiple event consoles that allow you to view and manage events. Each console shows different events subsets, depending on your current context.
Zenoss event consoles are:
Master - To access this console, click Event Console in the Navigation menu. You can view all events from this console.
Custom - Users can create custom event consoles from the Event Views tab within their user preferences. Each custom event console has access to the same events as the global console, but can be filtered more specifically (from the Edit tab).
Contextual - Contextual event consoles are found throughout Zenoss. Each time you see an Events tab on a device, device organizer, component, or event class, you can view event information that has been automatically filtered to show events specific to the current context.
The master event console is Zenoss' central nervous system, enabling you to view and manage events. It displays the repository of all events that have been collected by the system.
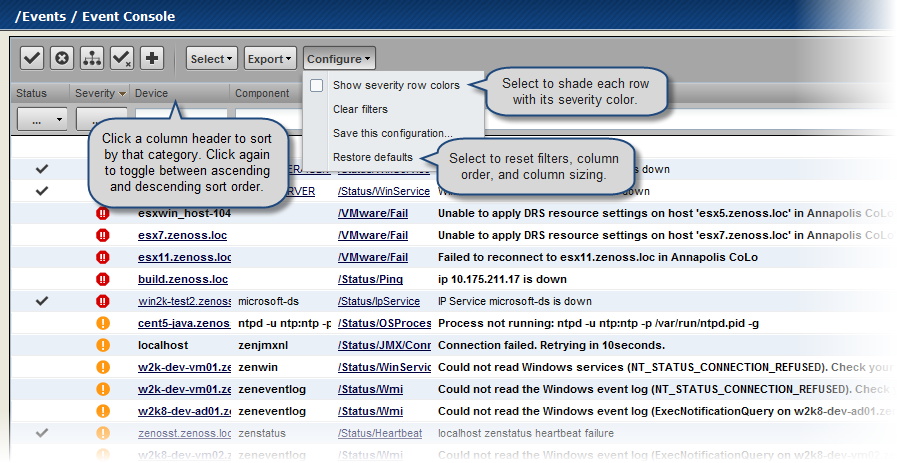
#7.1.6.1. Sorting and Filtering Events
You can sort and filter events that appear in the event console to customize your view.
You can sort events by any column that appears in the event console. To sort events, click a column header. Clicking the header toggles between ascending and descending sort order.
Filter options appear below each column header.
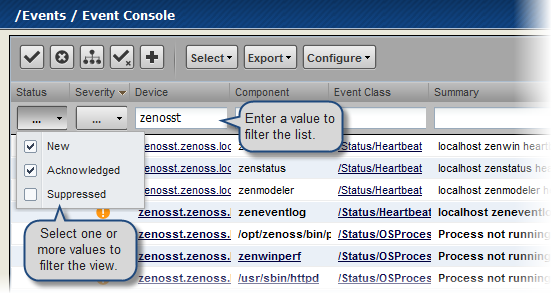
You can filter the events that appear in the list in several ways, depending on the field type. Date fields (such as First Seen and Last Seen) allow you to enter a value or use a date selection tool to limit the list. For other fields, such as Device, Component, and Event Class, enter a match value to limit the list.
The Count field allows you to filter the list when compared to a value:
n - Displays events with counts greater than or equal to that value.
<n - Displays events with counts less than that value.<=n - Displays events with counts less than or equal to that value.=n - Displays events with counts equal to that value.
To clear filters, select Configure > Clear filters.
#7.1.6.2. Saving a Custom View
You can save your custom event console view by bookmarking it for quick access later. To do this:
Select Configure > Save this configuration.
A dialog containing a link to the current view appears.
Click and drag the link to the bookmarks link on your browser's menu bar.
Zenoss adds a link titled "Event Console" to your bookmarks list.
Tip: You may want to re-title the bookmark, particularly if you choose to save more than one event console view.

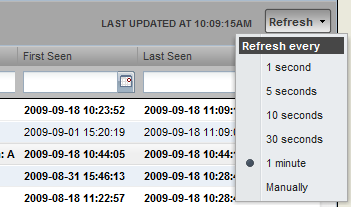
#7.1.6.3. Refreshing the View
You can refresh the list of events manually or specify that they refresh automatically. To manually refresh the view, click Refresh. You can manually refresh at any time, even if you have an automatic refresh increment specified.
To set up automatic refresh, select one of the time increments from the Refresh list.
#7.1.6.4. Viewing Event Details
You can view details for any event in the system. To view details, double-click an event row.
Tip: Be sure not to click other links in the row. These go to other pages.
The Event Details area appears.
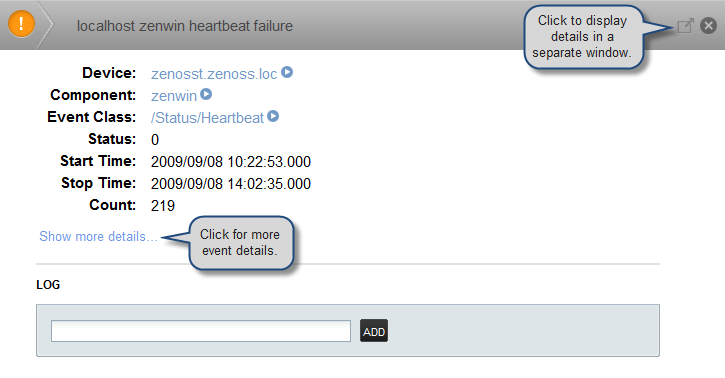
To see more information about the event, click Show more details. To display the event information in a new window, click the icon located at the top right.
You can use the Log area to add specific information about the event. Enter details, and then click Add.
#7.1.6.5. Selecting Events
To select one or more events in the list, you can:
Click a row to select a single event
Ctrl-Click rows to select multiple events, or Shift-Click to select a range of events
Click Select to select all, none, new, acknowledged, or suppressed events
#7.1.6.6. Acknowledging Events
You may want to mark an event as "acknowledged" to indicate, for example, that you have taken action to remedy a problem. To mark events as acknowledged:
Select one or more events in the event console view.
Click
 .
.
A check mark appears for each acknowledged event.
#7.1.6.7. Returning Events to New Status
You may want to return a previously acknowledged event to "new" status (revoke its "acknowledged" status). To do this:
Select one or more events in the event console view.
Click
 .
.
A check mark no longer appears in the event row, and the event is returned to "new" status.
#7.1.6.8. Classifying Events
Classifying events lets you associate one or more events with a specific event class. To classify events:
Select one or more events in the event console view.
Click
 .
.
The Classify Events dialog appears.
Select an event class from the list of options, and then click Submit.
Note
You can also classify events from event history.
#7.1.6.9. Exporting Event Data
You can export data from the event console to a comma-separated value (.csv) or XML file. To do this, select Export > CSV or Export > XML. By default, the exported file is named events.Extension.
#7.1.6.10. Moving Events to History (Close)
When you no longer want to actively monitor event (such as after you acknowledge it, for example), you can move it to history. To do this:
Select one or more events in the event console view.
Click
 .
.
The selected events are moved to history.
To view events in history, click the Event History link (located at the bottom left of the Event Console page).
#7.1.6.11. Returning Events to Active Status
You can return events that have been moved to history to active status. When you do this, the events reappear in the event console.
To return events in history to active status:
Click Event History to go to the event history page.
Select one or more events.
Click
 .
.
The selected events are returned to active status and appear in the event console.
#7.1.6.12. Creating Events
To create events from the event console, click ![]() .
.![]()
For more information about manual event creation, see the section titled "Creating Events Manually."
#7.1.7. Event Sources
Events come into Zenoss in two ways. Generated events are created as a result of active polling. Captured events are transmitted by external actions into Zenoss.
#7.1.7.1. Generated Events
These standard daemons are responsible for generating events in Zenoss. They automatically perform appropriate de-duplication and auto-clearing.
zenping - Ping up/down events
zenstatus - TCP port up/down events
zenperfsnmp - SNMP agent up/down events, threshold events
zencommand - Generic status events, threshold events
zenprocess - Process up/down events, threshold events
zenwin - Windows service up/down events
#7.1.7.2. Captured Events
Captured events are those events that Zenoss does not specifically know will occur in advance. De-duplication is performed on these events, but in some cases may need to be tuned. By default, no auto-clearing is done on captured events. Event transforms must be used to create the auto-clear correlations.
These standard daemons are responsible for collecting captured events:
zensyslog - Events created from syslog messages.
zentrap - Events created from SNMP traps and informs.
zeneventlog - Events created from the Windows event log.
There are a number of APIs available for submitting events into Zenoss. For more information, see the Zenoss Developer's Guide.
Any ZenPacks you install may optionally include their own daemons. For more information, see Zenoss Extended Monitoring.
#7.1.8. Creating Events Manually
You can manually create events. While this is not something you would do as part of normal Zenoss operation, it can be helpful when you are attempting to test mappings and transforms you have created.
#7.1.8.1. Creating Events through the User Interface
To create events manually through the user interface:
Navigate to Events, and then select Add Event from the table menu.
Note
You also can create events from the Event Console.
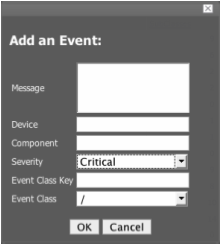
The Add an Event dialog appears.
Complete the basic event fields. If you want any event class mappings to be applied to the event you are creating, you must select the blank Event Class (rather than the default /). Event class mappings are applied only for events that do not already have an event class.
#7.1.8.2. Creating Events from the Command Line
To send events from the command line, use the zensendevent script, in this format:
zensendevent Options summaryCommon options include:
-d DEVICE, --device=DEVICE
-i IPADDRESS, --ipAddress=IPADDRESS
-y EVENTKEY, --eventkey=EVENTKEY
-p COMPONENT, --component=COMPONENT
-k EVENTCLASSKEY, --eventclasskey=EVENTCLASSKEY
-s SEVERITY, --severity=SEVERITY
-c EVENTCLASS, --eventclass=EVENTCLASS
#7.1.8.2.1. Example
The following example shows how to use the zensendevent script to simulate a ping down event:
zensendevent -d router1.example.com -s Critical -c /Status/Ping "Router down"
#7.1.9. Event Classes
Zenoss event classes are a simple organizational structure for the different types of events that Zenoss generates and receives. This organization is useful for driving alerting and reporting. You can, for example, create an alerting rule that sends you an email or pages you when the availability of a Web site or page is affected by filtering on the /Status/Web event class.
Following is a subset of the Zenoss default event classes. You can create additional event classes as needed.
/Status - Used for events affecting availability.
/Status/Ping - Ping up/down events
/Status/Snmp - SNMP up/down events
/Status/Web - Web site or page up/down events
/Perf - Used for performance threshold events.
/Perf/CPU - CPU utilization events
/Perf/Memory - Memory utilization or paging events
/Perf/Interface - Network interface utilization events
/Perf/Filesystem - File system usage events
/App - Application-related events.
/Change - Events created when Zenoss finds changes in your environment.
#7.1.9.1. Event Class zProperties
Just as device classes and devices have zProperties, so do event classes and event class mappings. zProperties are applied hierarchically, with the most specific zProperty being applied.
The following zProperties are available on event classes and even class mappings.
zEventAction - How and where affected events are stored when they occur.
status - Active events table
history - Historical event table
drop - Events are not stored
zEventClearClasses - Optional list of event class names whose active events will be cleared by clear events occurring in this class.
zEventSeverity - The severity of affected events is changed to this value unless the Original value is used.
A good example of how Zenoss uses the event class zProperties is found in the /Change event class. Within the /Change event class' zProperties, zEventAction is set to drop and zEventSeverity is set to Info. This configuration causes all of the changes in your environment to be stored as info severity events in the history table.
For more information about event manipulation techniques, see the section titled "Mapping and Transformation."
#7.1.10. Mapping and Transformation
Zenoss' event mapping and transformation system allows you to perform a wide range of operations, from altering the severity of certain events to altering nearly every field on an event, based on complex rules.
You cannot alter the following fields through event transformation. (This is because they are set after transformation has been performed.)
evid
firstTime
lastTime
count
The following illustration shows the path followed by an incoming event in the event mapping system.
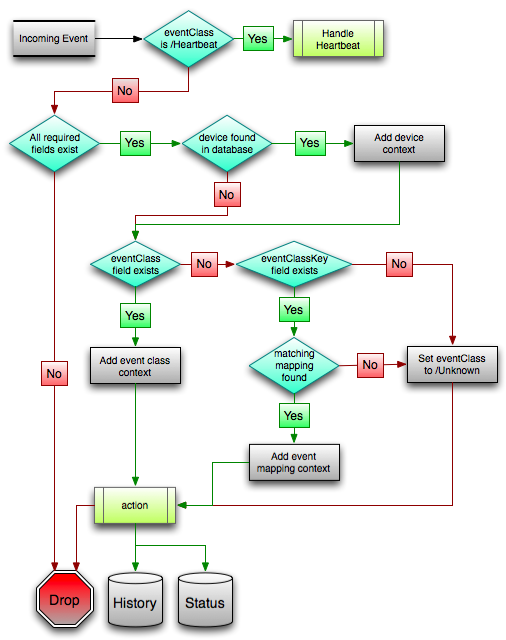
The mapping and transformation process begins with the "eventClass field exists" decision. This also is one of the more important differentiators in how you must handle a particular type of event.
#7.1.10.1. Event Class Mappings
There are two primary ways to view the event class mappings that exist in the system. The first is to go to Events in the navigation menu and click on the Mappings tab. This allows you to see all event class mappings in a single location. The EventClass column shows which event class the mapping is in. The other way to view the existing event class mappings is to go to the Classes tab of any event class. This shows you only event class mappings related to the current event class.
You can create event class mappings directly from the event classes, but this requires that you know the eventClassKey. A simpler way to create event class mappings is through the event console. Find an event that you want to match, select it, and then click Classify. Choose the event class that you want the event to be mapped to, and then click OK. This will automatically create the event class mapping with the correct eventClassKey, and example text against which you potentially can developer your regular expression.
From the Edit tab of an event class mapping, you can control which events it will match, as well as other properties:
Name - An identifier for this event class mapping. Not important for matching events.
Event Class Key - Must match the incoming event's eventClassKey field for this mapping to be considered as a match for events.
Sequence - Sequence number of this mapping, among mappings with an identical event class key property. Go to the Sequence tab to alter its position.
Rule - Provides a programmatic secondary match requirement. It takes a Python expression. If the expression evaluates to True for an event, this mapping is applied.
Regex - The regular expression match is used only in cases where the rule property is blank. It takes a Perl Compatible Regular Expression (PCRE). If the regex matches an event's message field, then this mapping is applied.
Transform - Takes Python code that will be executed on the event only if it matches this mapping. For more details on transforms, see the section titled "Event Class Transform."
Explanation - Free-form text field that can be used to add an explanation field to any event that matches this mapping.
Resolution - Free-form text field that can be used to add a resolution field to any event that matches this mapping.
The sequence tab of an event class mapping allows you to handle situations where you need to provide more than one possible mapping for the same eventClassKey. In this case, the sequence is evaluated in ascending order until a full (rule or regex) match is found.
Mappings have the same zProperties as event classes. Any zProperty set locally on a mapping will override the same property set on the event class. This works in the same hierarchical, most specific match, concept that device class and device zProperties work.
When a captured event (see the section titled "Event Sources") occurs, it will not have an event class pre-defined. For this type of event, you must create an event class mapping if you want to affect the event. If a captured event occurs and none of the event class mappings in the system match it, its event class will be set to /Unknown, and it will retain all of the default properties that it began with.
The next step of evaluation for events without an event class is to check on the eventClassKey field. This is the first and most important field that controls which event class mapping the event will match. If the event has a blank eventClassKey, or its eventClassKey does not match any event class mappings in the system, the special “defaultmapping” eventClassKey is searched for instead. This provides for a way to map events even if they have a blank or unpredictable eventClassKey.
#7.1.10.2. Event Class Transform
When a generated event occurs, it has an event class assigned to it. This causes the event class mapping step to be skipped. The only way to affect the fields of one of these events is through the event class’ zProperties and transform.
To access the transform for an event class:
Navigate to the event class.
From the page menu, select More > Transform.
Enter information into the dialog (as Python code).
The objects available in this Python context are evt (the event); and, if the event matches a device that exists in the Zenoss database, a device object.
#Example
The following example shows how you can validate that a device object exists before using it to drop events from a particular location.
if device and "Hawaii" in device.getLocationName(): evt._action = "drop"
#7.1.11. Event Life Cycle
In addition to some of the manual methods for getting events into the status or history tables, there are some automated processes that move events from status into history. The event life cycle is defined as all of the ways that events can get into the database, be moved within the database, and be deleted from the database.
The following illustration depicts the event life cycle.
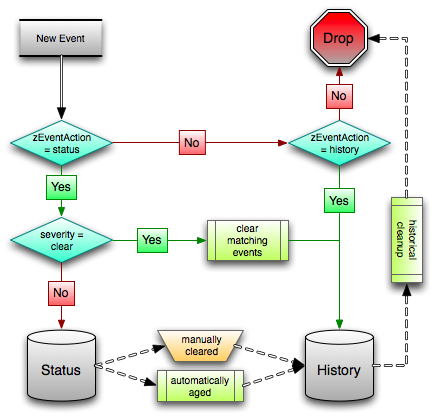
#7.1.11.1. Automatic Event Aging
From the event manager, you can set up automatic aging of certain events from the status table to the history table. This allows you to have lower severity events that do not reoccur for a specified length of time to be automatically archived to the history table.
Event manager properties that control this behavior are:
Event Aging Threshold (hours) - By default, set to 4 hours.
Don't Age This Severity and Above - By default, set to Warning.
With the default settings, Debug, Info, and Warning events that do not occur for four hours are automatically moved into the history table.
#7.1.11.2. Automatic Historical Event Cleanup
You can set up automatic purging of events from the history table from the event manager. When events are purged from the history table, they can be recovered only from Zenoss backups. For this reason, the default setting is 0, which specifies that events are never automatically purged from history.
The event manager property that controls this behavior is Delete Historical Events Older Than (days).
#7.1.12. Event Commands
Event commands allow Zenoss to run arbitrary shell commands when events occur that match pre-configured criteria. This allows almost any action to be taken in response to events that occur.
Common uses of event commands include:
Auto-remediation of events. You can use SSH to remotely restart services on a UNIX system when they fail, or winexe to do the same for Windows services.
Integration with external systems. This includes sending SNMP traps to other management systems, or opening tickets in your incident management system.
Extending alerting mechanisms. Currently, Zenoss supports only email and pagers as alerting mechanisms "out of the box" through normal alerting rules. You could use event commands to alert through instant messaging systems, or by playing sounds.
The event commands that you configure are evaluated and executed by the zenactions daemon once each minute (just as in alerting rules).
#7.1.12.1. Creating Event Commands
To create or edit event commands, go to the Commands tab of the event manager. From here, you can adjust these properties:
Enabled - If set to True, then the command is evaluated and executed.
Default Command Timeout (secs) - Length of time in seconds that Zenoss will wait for the commands to run that you specify in the Command and Clear Command fields. If the command takes longer than this, Zenoss kills it.
Delay (secs) - Specifies the minimum age (in seconds) of an event before the command will be executed on it. This prevents commands from being run for flapping events.
Repeat Time (secs) - If the command runs, then it will run again in the specified seconds if the triggering event is still active. Setting this value to 0 causes the command to be run only one time.
Command - Specifies the command that will be executed in the shell when the criteria specified in the Where field match an event. This command is executed as the zenoss user, and uses TALES syntax for variable substitution. (For more information about TALES, see the appendix titled "TALES Expressions.") Available variables are
evt,device, andcomponent.Clear Command - Similar to the Command property. This is executed only when an event that originally matched the criteria is cleared.
Where - Defines the criteria that an event must match to trigger this event command.
#7.1.13. Capturing Email Messages as Zenoss Events
ZenMail and ZenPop allow you to capture email messages as events in Zenoss. This capability can be useful for situations in which embedded systems (such as WAPs, NAS devices, or RAID controllers) rely on email notification for events.
#7.1.13.1. ZenMail
ZenMail serves as an SMTP server that you can bind to a specific TCP port. You can then configure your embedded system to send mail to the Zenoss server explicitly by using the Zenoss server's IP address as the relay.
ZenMail supports these configuration directives:
${ZENHOME}/bin/zenmail(no arguments) - Default operation. Binds to port 25 on all ports and listens for email messages to arrive. Ignores the TO field in the email and uses the FROM address as the device IP address.${ZENHOME}/bin/zenmail--listenPort- Bind to the port provided. Useful in situations in which an SMTP server is already running on the Zenoss server and you do not want to interfere with the existing mail delivery system. Semantics are the same as the no argument version (FROM address is used as the device IP).
#7.1.13.2. ZenPop
ZenPop allows you to retrieve event email from a POP server. ZenPop supports these configuration directives:
-usessl- Issue the STARTTLS command to the POP server and attempt to transfer email messages using SSL encryption. This is required if retrieving mail from Google.--nodelete- Do not issue the DELE command after retrieving all messages. Typically this is used during initial testing so that you do not have to resend test messages to the POP account. Some email systems (such as Google) do not actually delete messages when the DELE command is issued.--pophost- The hostname or IP address of the POP server from which to retrieve messages.--popport- The TCP port the POP server listens on. Defaults to 110. Used in situations where the POP provider listens on another port (for example, Google on port 995).--popuser- The user name that contains email messages to retrieve.--poppass- The password to use for the user name provided.--cycletime- The time to sleep between polls. After all email is retrieved, ZenPop sleeps for this amount of time before waking up and attempting to pull new email.
#7.1.13.3. Translating Message Elements to the Event
Zenoss translates various message elements to the event, as follows:
FROM Field - If the FROM field is an IP address, then Zenoss associates the event with the device with the same IP address. If the FROM field is a fully qualified domain name, then Zenoss resolves it to an IP address, and then performs the device association using the resolved IP address. The resolution of hostname uses "A" records rather than "MX" records.
TO Field - Zenoss ignores the TO field in the email message. ZenMail accepts email to any user and domain name combination. ZenPop also drops the TO field, and uses only the FROM field.
SUBJECT Field - ZenMail and ZenPop use the SUBJECT as the event summary.
Message Body - ZenMail and ZenPop use the first mime attachment as the event details. Zenoss ignores secondary message bodies (typically HTML-encoded versions of the message). It also ignores attachments (such as files).
